Tuesday, December 17, 2019

Veterans and Volkites!

I've been busy lately drawing and cutting out paper figures, but I haven't neglected my regular painting duties. Some friends and I are planning a big game of the Horus Heresy in the coming weeks, and I've been nattering away at some reinforcements.

First up are some classic Rogue Trader era Space Marines. I picked these guys up on kind of a lark - its been fun to apply my current painting skills to old models that when I originally owned them I painted terribly. Sometimes I think that's 90% of the nostalgia of Oldhammer for me. The new sculpts are better by pretty much every measure, but the chance to go back and get a second bite at the apple has a big appeal.

Everyone's head is suffering from some different form of hydrocephaly, it looks like.
I'm going to use these guys as a Veteran Squad. I see them as having been some of the Emperor's original experiments in gene-altering, before he got the process right and marines became semi-proportional.

Next, I am also adding a Heavy Weapon Squad with some Volkite Culverins. I picked up the weapons and have modified them a bit to fit onto plastic Mark III armor (which makes up the vast proportion of my army). 

The resin bits on these guys are super delicate and were really finicky to build. But I'm happy with how they turned out.

I hope to add some more Tactical Marines to a couple of squads soon, but in the meantime I'm trying to finish up a War Cry starter set for a buddy.

Cheers!


Monday, November 25, 2019

It All Looks Good On Paper

A few months ago, I got a wild hair up my butt and was seriously considering building a set of armies for a war game based on the Thirty Years War. I knew I wanted big blocks of pikes, at least 18 units per side, and I wanted to do the whole thing in 28mm. After careful consideration, I came to the conclusion:

I WAS BONKERS.

There was no way I could commit to a project like that financially or time wise. The last time I'd done something that insane was for Napoleonics, and that had taken me damn near four years to complete. But I couldn't fully let go of the idea. I found myself picking up a copy of Peter Dennis' paper soldiers for an English Civil War game and thought to myself "Hey, stupid. You DRAW for a living. Why not try something like this? I bet if it was grand enough, it'd look awesome." So I set about trying my hand at designing and making my own paper soldiers.

A selection of paper soldiers in the colors of the Imperial household. This is just a fraction of what I printed out and
built. So far, I have 18 units for each of the Imperial and Swedish armies.
The pikes were made using plastic bristles from a broom, and each unit has its own flag that can be cut out and glued on.
Cannons were given a level of three-dimensionality in a simple, but effective, way.

It was a fun little side project that I'm still nattering away on. Paper minis will never replace 3D ones for me, but they are a quick and economical way get into playing war games. Additionally, if I run games with them at conventions, I'm less concerned with players breaking my precious models or ruining paint jobs by transporting armies. 

In a shameless bit of self-promotion, I've also done some paper fantasy armies for use with my Shieldwall war games rules. Again, I'd love to have a Goblin army in 3D, but the time it'll take is a little prohibitive at the moment. So these are a nice, simple alternative. 

An army of hideous Goblins!
                                            

The Goblins are opposed by an army of noble Elves


I've got a couple more armies in the queque - Undead and Halflings. I hope to do Dwarves and Servants of Anarchy soon after. For those who demand only the finest of 3D models, do not despair! I'm not hanging up my paint brush any time soon. In fact, I've been making good headway on my Imperial Roman army and am closing in on finishing that project soon(ish).

Cheers!


Sunday, November 10, 2019

Shieldwall Launch!

At the beginning of the month, I launched a set of fast-play fantasy war games rules called Shieldwall.  They are available here at WargameVault.com for $15US. I figured this would be a good place to direct those who are potentially interested with a bit of an overview of the system.


As I've gotten older, I've come to prefer lighter rules systems for my wargaming. The less I have to remember the better, and the more easily I can adapt a system to my own miniatures collection the happier I am. I set out to write Shieldwall to accommodate my own needs for playing games, and I've released it in the hopes it might be enjoyed by others.

Shieldwall is a mere 17 pages, with the core rules taking up only four pages. Lets look at a few of the ideas in the game and why I like using them:

Army Composition
Armies are composed of 12 units total - a variety of infantry, skirmishers, missile troops, cavalry, generals and monsters. The game is model agnostic - so the number of models in these units is entirely up the players, Shieldwall doesn't require specific model counts or unit sizes. Players simply agree to how big they think units should be. If player's collections allow only ten man units, those work fine. Players with larger collections could decide that twenty man units are the minimum. Its really up to you.

Scenario Forces
There are six scenarios included in Shieldwall. Once players decide on which scenario to choose, they randomly generate a force from their army dependent on the rules of the scenario. So an army in Shieldwall is more of a pool that players draw from. This ensures that scenarios can be replayed quite a bit as your force changes each time, and it prevents players from choosing one optimal build that they then game with every time. This means almost every game of Shieldwall is different and poses a new tactical challenge every time.


Combat
Units roll a number of dice dependent on their type, and results of 5 or 6 indicates a HIT has been scored on the enemy unit. Once a unit accumulates three or more HITs at the end of a turn, they are eliminated. Record keeping is kept at a minimum and a Quick Reference Sheet is included.

Special Event Cards
The friction of battle is represented in Shieldwall with a deck of Special Event Cards that can be printed from the pdf. During a game, players will draw hands of cards and then play them to modify attacks, execute special maneuvers and cast powerful spells. The Special Event Cards keep the game from becoming stale and predictable, while also maintaining a balance between forces.

Magic System
The magic system in Shieldwall is directly tied to the Special Event Cards. Players can wield the powers of Order, Chaos, Life and Death to scatter their enemies from the battlefield. Shieldwall assumes every army has wizards steeped in arcane knowledge or clerics beseeching the Gods for miracles, so you are never penalized for not bringing a wizard. However, if you choose to, you can make your General an Arcane Master which unlocks additional spell effects if you play cards associated the proper school of magic that the general has pre-chosen.


Command and Control
Every army has a general, a mighty character who will move across the battlefield rallying troops, bolstering their combat effectiveness or giving bursts of speed. Proper positioning is key to keeping your troops in the fight and ultimately to victory.

Campaigns
While the scenarios included can be played individually, they can also be played as a series of linked battles. Most games take about an hour, meaning its possible to play multiple games in an afternoon. You can decide the outcome of a full story in a few games time.

On The Horizon
I have a few plans for future Shieldwall products. Very soon, a print and play paper Elf army will be available on Wargames Vault. I hope to follow it with army packs for Goblins, Halflings and Undead as soon as I can finish drawing them!

I hope this peaks your interest!

Cheers!


Friday, September 27, 2019

The Legion Grows!

For the Glory of Rome!

The last few weeks have seen me nattering away on my new Roman project. I've managed to complete thirty of these sculpts from Victrix Lmtd and its all starting to look like a little force now. I'm building the army with the intent to use them with a heavily modified version of Neil Thomas' One Hour Wargames rules (I'll post the mods up sometime soon) or Basic Impetus. Right now I can use these as three separate units in those games, or I could form them into a large single unit for something like Hail Caesar.

Unit one has a Centurion and associated command units. 
Unit two is all infantry, with the front rank advancing.
Unit three is more troops advancing under watchful eye of an Optio in the back rank.

I'm super happy with how these guys are shaping up. I'm not really going for historical accuracy - more of trying to create the Roman army that I've always wanted in my head. The next unit will be a ten man unit of Praetorians, mostly because they are fun models and will look really cool in a unit. I've also got some archers winging their way across the Atlantic from Wargames Foundry, so I'm looking forward to adding some missile weapons to the force. 

Cheers!


Sunday, September 15, 2019

Back to Rank and Flank

Looks like some of my future projects are a return to games involving mass ranks of troops organized in blocks. Its a good place to return to, and its been a while. First on deck, I finished up my first unit of Early Imperial Romans. I have mounted them on a 120mm x 60mm base, and I really like how it lets everything breath and have room. The basing size is compatible with the Impetus rules system, but I think I'm aiming to build the army around a heavily modified version of Neal Thomas' One Hour Wargames rules.

These are Victrix plastic kits - Roman Legionaries Advancing. I've got three more blocks of these cats to do.

I also drifted back into Oldhammer this week by completing a fourth unit of High Elf archers. The command group is cobbled together, but overall I think it works. Also of note in this unit: the archer on the viewer's right is the first ever model my girlfriend has painted. She sat down to try it out and under my cruel tutelage managed to do an amazing job for her first ever mini!

This unit brings me to 40 archers in the army. 

On deck are more Roman infantry and a classic Tiranoc Chariot that's been begging for some attention. 

Cheers!


Monday, September 9, 2019

"Alea Jacta Est."

The die is cast. 

I have always wanted a model army of Early Imperial Romans. I've tried twice before to build a Roman army - once with Italleri plastics in 1/72 scale and once with Old Glory metals in 28mm. Both times I enjoyed painting them, but got side-tracked with other projects. A few months ago, I picked up a pair of sets of excellent Legionaries by Victrix and they've been sitting in my "To-Do" pile. This week I managed to assemble some and start painting them. 

These models are from Victrix's Legionaries Attacking set. 
Starting with a red priming coat, these guys paint up super quick! I also made some custom shield decals in Photoshop and printed them out on waterslide transfer paper. It takes some extra cutting to make holes for the shield bosses, but I think its really worth the end effect. 

I've got two sets of 25 guys each, so I should be chewing through them for a little bit. But right now, I'm 1/10 of the way through them and already planning for my next purchases. I'm unsure what basing scheme or rules set I'll be using, but I'm definitely leaning towards something Mass Battle-y. 

I also managed to get the last of the weapon options for my Warlord Titans painted up this week. Now everything I own for Adeptus Titanicus is completely painted. Huzzah!

A Sun Fury Plasma Annihilator and Arioch Power Fist for my Legio Mortis Engines.
The Mori Quake Cannon for my Legio Gryphonicus. 

I've also been doing some paper craft hobbying - terrain for Adeptus Titanicus and two whole armies for the Thirty Years War. I'll share more on those projects as I can!

Cheers!


Monday, September 2, 2019

House Epidemios Armigers

Hail, hail! The Gang is all here!
This week, I built and painted a third Armiger War Dog for my Death Guard army. I've realized that my force has struggled with fighting armored units in the past, and leaning into some support in the form of some Armigers will probably help mitigate that deficiency a bit. Plus, in terms of simple math - a third Armiger brings me to 200 Power Levels for my Death Guard and their allies.

I've tried to make each Armiger unique in silhouette, and for this one I decided to remove the arms
and move the weapons to a top mount. 
As usual, the GW Skull kit was amply raided to add a new head and plenty of trophies
across the hull.
Hopefully, the auto cannons on this version will give me real long range punch and allow some
more variety in the units that I choose.

I think completing this unit will let me put a bit of a pin in my Death Guard army for a while. I'd like to play some more Apocalypse games with it, as well as maybe some narrative 40k games. I'm in the midst of choosing my next big miniatures project, and there are some excellent Imperial Roman model by Victrix that have been languishing in my "To Do" pile for way too long. 

Cheers!


Monday, August 26, 2019

House Epidemios Knights and More Death Guard

A new Knight, The Corpsegrinder, joins the ranks of the traitorous House Epidemios

Not too long ago, I was given the new Chaos Knight kit from Games Workshop by my buddy Marky. When the model had been previewed, I was interested but just couldn't justify sinking the cash into another Knight. As Fate would have it though, Marky picked one up and then realized he had little interest in painting it so with a stuttering "Y-y-you sure?" I became the owner of a second mini-titan. 

Not one to do things the easy way, I knew I had to convert it a bit to keep in theme with my other House Epidemios units. While I didn't go as crazy as I did on the first Knight, I did end up spending a little cash to get some parts that I thought would really spruce the joint up - so to speak. Additionally, I knew that I wanted this Knight to be primarily anti-infantry as my other Knight was definitely kitted out for busting tanks. So, I grabbed some parts from the first set and worked on making them fit the new one.

Corpsegrinder - Renegade Knight in service to the Plague God.
I tried to keep the build simple and still have it fit in with my existing army.
The head is from the Lord Discordant's mount. The moment I saw it, I knew
it had to be the Knight's head. I also added a decal of some Hieronymus Bosch
art onto the tilting shield. I think it ties together nicely with the Mona Lisa
on the shield of my first Knight, Plague Reaper.

Once again, the left shoulder pad of the Knight is decked out in
skulls. Picking a theme and repeating it throughout an army is a
great way to tie everything together.
I kept the back pretty simple. Hopefully, my opponents will
only ever see the front!
Final shot from a slightly different angle. 

Not to be forgotten, I added two more five-man units of Plague Marines to my Death Guard army. The whole group is almost to 200 Power Levels for gaming. Hopefully, I'll take a full army shot when its all done. 

Squad Corrosis
Squad Mortibund

Cheers!


Saturday, July 20, 2019

Mixed Bag 16: Clean Up on Aisle 16!

Since I last updated this blog I've been chewing away at finishing up some projects that have languished on my painting table or in my bitz box. These are projects that I always meant to do, but got side-tracked from completing - I have to say that it feels really good to have these projects done.
First up was a trip to Warhammer Age of Sigmar-land.

These five Blood Warriors have been on my desk for an eternity, but now they are
ready to bring destruction to the foes of the Blood God for an eternity! These guys
bring me to two ten-man units of Blood Warriors for the whole army.

Staying in a fantasy theme, I decided to turn my paint brush to my Oldhammer High Elves. I've had a unit of Dragon Princes that I've been nattering away on for months - doing one model at a time - mostly because I just found painting them somewhat tedious. Its not a bang on the sculpts, I think I'm just coming to a conclusion that I really don't dig painting cavalry!

These cats took way too long to get on the field, so I'm sure they will die horribly
on the battlefield without making an impact. FUN!

Next was a command section and a handful of bowmen to round out a new High Elf archer unit. Once they were done, I decided to finish the Elf Prince mounted on a Griffon that came with the Isle of Blood starter so long ago. I plumbed for a wild green color - I wanted something different and reflective of the Chaos-ey nature of the monster. I realize it's not going to be everyone's cuppa tea, but that's was kinda the point. 

SCRAAAW!

Finally, having picked up the new 40k Apocalypse rules-set I decided to try and round out my Nurgle army for some giant games. This led to the assembly of a third Foetid Bloat Drone. The Bloat Drones are pretty powerful units - nearly on the level of some tanks - and were a quick way to add some firepower to my army while only having to raid my bitz box. 

Three happy little daemon engines all ready for a good time!

This brings my yearly total for models painted to 241 so far. Still a bit to do to get to 365, but not too shabby. 

Cheers!


Friday, July 5, 2019

Quick "N Dirty Hobbit Holes


"In a hole in the ground there lived a hobbit. Not a nasty, dirty, wet hole, filled with the ends of worms and an oozy smell, nor yet a dry, bare, sandy hole with nothing in it to sit down on or to eat: it was a hobbit-hole, and that means comfort."

With the addition of some more models to my Halfling army, I realized that I'd need some bespoke terrain for them - to act as scenario objectives and/or add character to battlefields that the little legion would play on. I wanted to create some cheap and fast Hobbit Holes for my army to live in. I saw that Games Workshop was putting out some nice resin facades to build off of eventually, but I just didn't want to wait or spend the money. I looked for a good tutorial online for building what I was looking for, but I just didn't find one. So I guess I had to do one myself.

The material list isn't too long and mostly consists of stuff I had lying around. You'll need:
     -  Some 2" thick insulation foam.               - A plastic drinking straw.
     -  A blank CD to act as the base.                -  Some scrap cardstock/cereal box cardboard.
     -  Some balsa wood strips.                          - A push pin.
     -  Various flock/plastic flowers/tufts.          - Xacto knife and a box cutter with an extendable blade.
     -  Hot Glue gun.                                          - Wall joint compound
     -  Wood Glue or Elmer's Glue

Step 1: Cut a slab of foam about 1/4" deep, 5" long and 2" high.
Using a ballpoint pen, I drew out the windows, door and stonework for the
front of the house.
Step 2: Using a sharp Xacto blade, cut out the windows and door.
I also removed some of the non-stone area to recess that a bit and bring
the stone forward.
Step 3: Glue some scrap card onto the back of the front piece.
It'll give you something to glue the door and window bits to.
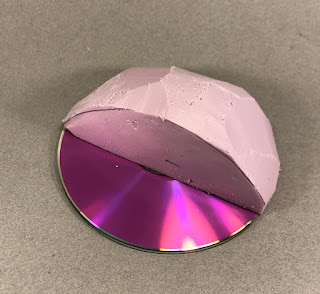
Step 4: Using a hot glue gun, I attached the 2" foam to the CD as a
base. I then used a box cutter with an extendable blade to shape the hill
until it matched the approximate curve and height of the front piece.
Step 5: I then attached the front piece using hot glue. Any gaps or joins were
hidden with some wall joint compound. I then glued a bit of drinking straw to the hill to
form a chimney. A few thin cuts of foam were added to make a walk.
Step 6: I added a door and cross beams using balsa wood.  A dress maker's
pin was used to make the door hand. I also soaked a piece of balsa wood in
water until I could bend it into a curve along the top edge and then affixed it
with hot glue. A small cap was added to the chimney with some cardstock.
Finally, sand was glued down to the front porch area. 
Step 7: I primed the whole shebang with a bit of flat latex black house paint.
Then I painted the whole thing up in a pretty standard way.
Step 8: I then flocked the hill to match my game boards and added some
tufts, clump foliage and flowers to really make the hole feel homey.

And that's it. Each Hobbit Hole took about an hour to make and cost me pretty much nothing as I had all the materials to build them laying about already. They aren't the most amazing pieces of scenery ever made, but they will really add something to the games I end up playing with my Halfling army. Hope this inspires!

Cheers!

A few nights work and I have my own little Shire to defend!