Showing posts with label Painting Tutorial. Show all posts

Friday, July 5, 2019

Quick "N Dirty Hobbit Holes


"In a hole in the ground there lived a hobbit. Not a nasty, dirty, wet hole, filled with the ends of worms and an oozy smell, nor yet a dry, bare, sandy hole with nothing in it to sit down on or to eat: it was a hobbit-hole, and that means comfort."

With the addition of some more models to my Halfling army, I realized that I'd need some bespoke terrain for them - to act as scenario objectives and/or add character to battlefields that the little legion would play on. I wanted to create some cheap and fast Hobbit Holes for my army to live in. I saw that Games Workshop was putting out some nice resin facades to build off of eventually, but I just didn't want to wait or spend the money. I looked for a good tutorial online for building what I was looking for, but I just didn't find one. So I guess I had to do one myself.

The material list isn't too long and mostly consists of stuff I had lying around. You'll need:
     -  Some 2" thick insulation foam.               - A plastic drinking straw.
     -  A blank CD to act as the base.                -  Some scrap cardstock/cereal box cardboard.
     -  Some balsa wood strips.                          - A push pin.
     -  Various flock/plastic flowers/tufts.          - Xacto knife and a box cutter with an extendable blade.
     -  Hot Glue gun.                                          - Wall joint compound
     -  Wood Glue or Elmer's Glue

Step 1: Cut a slab of foam about 1/4" deep, 5" long and 2" high.
Using a ballpoint pen, I drew out the windows, door and stonework for the
front of the house.
Step 2: Using a sharp Xacto blade, cut out the windows and door.
I also removed some of the non-stone area to recess that a bit and bring
the stone forward.
Step 3: Glue some scrap card onto the back of the front piece.
It'll give you something to glue the door and window bits to.
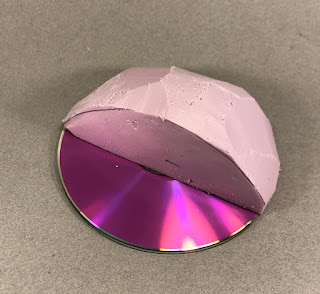
Step 4: Using a hot glue gun, I attached the 2" foam to the CD as a
base. I then used a box cutter with an extendable blade to shape the hill
until it matched the approximate curve and height of the front piece.
Step 5: I then attached the front piece using hot glue. Any gaps or joins were
hidden with some wall joint compound. I then glued a bit of drinking straw to the hill to
form a chimney. A few thin cuts of foam were added to make a walk.
Step 6: I added a door and cross beams using balsa wood.  A dress maker's
pin was used to make the door hand. I also soaked a piece of balsa wood in
water until I could bend it into a curve along the top edge and then affixed it
with hot glue. A small cap was added to the chimney with some cardstock.
Finally, sand was glued down to the front porch area. 
Step 7: I primed the whole shebang with a bit of flat latex black house paint.
Then I painted the whole thing up in a pretty standard way.
Step 8: I then flocked the hill to match my game boards and added some
tufts, clump foliage and flowers to really make the hole feel homey.

And that's it. Each Hobbit Hole took about an hour to make and cost me pretty much nothing as I had all the materials to build them laying about already. They aren't the most amazing pieces of scenery ever made, but they will really add something to the games I end up playing with my Halfling army. Hope this inspires!

Cheers!

A few nights work and I have my own little Shire to defend!


Monday, April 1, 2019

Rhinos Ready to Rumble - Step-by-Step

My armored spear head for my Imperial Fists grows!
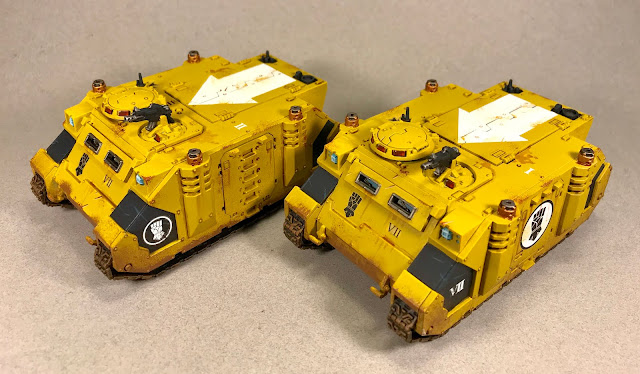
I've added some much needed armor and mobility to my Imperial Fists army in the form of a pair of Rhino APCs and I thought I'd share a quick step-by-step of the whole process. The building of the kits is totally standard, and everything went together quickly. After that, I primed the hulls white for two reasons: first, a good priming coat is always a good thing and two, the white would form the basis for the tactical insignias on the top doors of the transport.


After the primer was dry, I took some painters tape and masked out the arrows. I laid the tape out on a piece of glass before I cut it to shape. Then I transferred the mask from the glass to the actual tank.


The tanks were then sprayed with Testor Model Master's Afrika Mustard. Once that dried, I applied several coats of GW Yriel Yellow with an airbrush. Once all that was dry, the tape was removed and the white tactical arrows were revealed. The arrows weren't perfect, but any over-sprays could be easily cleaned up with some Vallejo White.


I then did some panel-lining with GW Agrax Earthshade to create some definition between armor plates and add some initial weathering. Some black panels were added and then some chipping was added with a sponge and Vallejo Dark Flesh. Some chipping on the tactical arrows were added with Yriel Yellow. This helped age the model and hide any bleed-through or mistakes from the initial masking.


Next was finishing up some details like painting the smoke stacks, view ports and tracks. Weathering was added to the bottom of the tank with a heavy drybrush of Vallejo Beasty Brown. Decals from the Forge World sheet for Imperial Fists were then added.


I added some final weathering with streaks of GW Reikland Flesh Shade and a few chips on the black  areas with P3 Coal Black. And they were done!

Cheers!


Sunday, September 2, 2018

The God Engines Walk!

With the release of Adeptus Titanicus, and my impulsive decision to buy it, I guess it deserves a big blog post.  I'm half way through painting the Grand Master edition and I'm at a place where I can show off the Traitor forces, a paint step-by-step and the board I'll be gaming on.

Warlord Titan Mors Destinarat of the Legio Mortis supported by a
banner of Knights from House Malinax.

First up was painting one of the two Warlord Titans that come in the set. I opted for a paint scheme of the Legio Mortis. Initially my plan was to just build a Traitor force, but my love for the War Griffons and having two forces has won out - I'll be painting the other model in the colors of the Legio Griffonicus. This plan to build two Titan maniples is completely deranged; but in for a penny, in for a pound I guess. Nobody ever played these games because they were economical.

The Warlord is a stunning kit, equally on par with the 40K Knight kit in terms of
complexity and articulation. 
Its almost TOO much detail. The kit takes quite a while to build and I wonder afterwards if it wasn't
just a clever ploy to get me used to the idea of assembling a 28mm scale Warlord from Forge World.
The whole thing is very well engineered, however; and I was able to pose it how I wanted
with zero conversion work.
The level of detail is NUTS. They even got the railing on the platform for entering the Titan.
A banner of Knights supports each Warlord in this set. These guys are absolute BONKERS. 21 pieces each. For a model smaller than a Primaris Marine. While I appreciate the dedication, I think these cats were a little too complex for wargaming figures.

Once the Titan and Knights were done, I turned my attention to the buildings. These kits were a little frustrating - I feel like I've been spoiled by the absolutely fantastic 28mm scenery that Games Workshop has been putting out recently. While highly modular, the Adeptus Titanicus city models were fiddly and tedious to assemble. They forgo some of the more clever locking mechanisms of modern models and take time to get right.
I decided to keep the scheme on the buildings relatively simple. I want terrain to act as a backdrop for the models and
not compete visually when laid out.
My current 4'x4' board. I plan on trying to pick up some N scale bridges and maybe a refinery set to add to the city.
A closer look at some more of the buildings.
A veritable nest for the Knights to hide in.

Finally, I also managed to take step-by-step photos of painting the Warlord as I went. Anyone who follows me on Twitter or Facebook has seen these, but I'm collecting them here with some notes for anyone who wants it.

STEP 1. The Warlord is assembled. I left off 95% of the armor panelling - that
would be painted on the sprue and left the under skeleton easy to access. The head
was also left separate, but its Blue-Tack'ed into place in this photo. The gun
arms and rocket pods were also magnetized at this point. GW left recesses
5mm wide by 1mm deep so you can swap the weapons out with future weapon
upgrades.
STEP 2. Everything was undercoated using Rustoleum Aged Bronze.
Once dry, this was all drybrushed with GW Runefang Steel.
STEP 3. I began picking out the gold details and trim using GW
Retributor Armor. This was then washed with GW Reikland Flesh shade
and high-lighted with a drybrushing ofGW Runefang Steel.
The dark panels were painted with P3 Coal Black and washed with
Army Painter Dark Tone Ink once dry.
The head was base coated with GW Administratum Grey and then
high-lighted in several layers using White mixed with Administratum
Grey in successively greater amounts.
STEP 4. A continuation of Step 3, more and more detail was picked
out across the model. The heat stress on the barrels of the Volcano cannons
was added by heavily washing the fronts with GW Druchii Violet shade.
At this point, once I was happy with the under skeleton, it was time to start
adding armor plates.
STEP 5. I undercoated the armor plates while they were still attached
to the frame. The side of the armor facing inwards, towards the skeleton, got
a coat of Rustoleum Aged Bronze. The outward facing side then was sprayed with
GW Retributor Armor Spray. This saved me a ton of time - it was easier to neaten things
up after the spray (which I would have to do anyway after clipping them off the frame)
than pick out all the trim. The gold side was washed with GW Reikland Flesh shade and once that was dry,a quick drybrushing of GW Runefang Steel brought out the detail and highlights.

TOP TIP! - Rather than painting a panel and then picking out trim, its almost always
easier to paint the trim first and then fill in the broad surfaces with color. Its quicker
and more forgiving than doing it the other way. Trust me. Try it. You won't regret it.
The broad areas of the panels were painted P3 Coal Black and washed with Army Painter
Dark Tone ink for the black plates. The red plates were painted with Vallejo Dark Flesh and then
highlighted by adding progressively more Vallejo Red to Dark Flesh in several layers.
Finally, the striping was painted in over the red plates using the same Coal Black/
Dark Tone technique as the armor plates.
STEP 6. Decals were added and then weathering was applied by
using a small bit of sponge to dab random spots of GW Dryad Bark
around the plates. Once dry, a few thin lines of highlight red were added
around the spots. Then P3 Brown Ink was used to add streaks of wear and
rainwater damage across the hull. The feet were given a drybrush of
Vallejo Beasty Brown.
Craters were added to the base by using rings of modeling putty covered with sand.
Finally, the base was painted with GW Agrellan Earth. Once dry and cracked, the base
was coated with P3 Greatcoat Grey and then washed with Army Painter Dark Tone ink.
Then two layers of drybrush were added - first with GW Adminsitratum Grey and then
GW Ushabti Bone.
Lastly, the rim of the base was painted with Vallejo Black. 
Whew! I should actually get to play the game soon against a buddy with a painted force. Then its onto the Legio Gryphonicus.

Cheers!


Sunday, March 18, 2018

Kharadron Arkanaut Step-by-Step

My first unit for my Kharadron Overlords is finished! A stalwart company of Arkanauts is ready to join the hunt for Ur-Gold or whatever it is they do besides look cool as shit. I dunno. I was able to take some time to take photos for a step-by-step of how I painted this unit.

"Sailing! Sailing! Over the bounty sky!"

After assembly, the model was primed with a white spray. Once that
was dry, I then sprayed it with Testor's Model Masters' Africa Corps  Mustard.
The color is a dead ringer for GW Zamesi Desert and that can be used to
touch-up anywhere the spray missed.
Next, the model was heavily drybrushed with GW Ushabti Bone.,
paying particular attention to the areas of the suit cloth.
The suit was then highlighted with Ushabti Bone applied as thin lines
and then final highlights were added with a 50/50 mix of GW
Ushabti Bone and Vallejo Skull White.
The armored parts of the suit were then painted with P3 Coal Black.
At the same time, belts and straps were painted with Vallejo Scorched Earth
and GW Leadbelcher was used to base coat parts of his weapons and
tools. The base was coated in P3 Greatcoat Grey.
Once dry, all the previous areas that aren't under suit were shaded
with Army Painter Dark Tone Ink. Shading everything all at once is
more efficient when you are batch painting models. 
All the gold areas were then coated with GW Retributor Armor.
Highlights were added to the straps with Vallejo Dark Flesh.
His rag was painted Vallejo Squid Pink and the base was finished
by drybrushing GW Administratum Grey followed by a light
drybrush of GW Ushabti Bone. The rim was then painted
Vallejo Black.
GW Reikland Flesh Shade was applied all over the gold and pink
areas pretty liberally.
Now it's time to highlight the metals! Gold areas got a highlight of
GW Auric Gold and then GW Runefang Steel was used to highlight the silver
metals and as a final highlight of some areas of the face - like the nose, brow,
and mustaches.
A wash of GW Druchii Violet was applied over the sash and in the
sockets of the eyes.
Eyes and lenses were finished with Vallejo Foul Green and a dot
of 30/70 Foul Green and White mixed. 

And there ya go! I generally did one or two of these guys a night, so the unit came together in about a week. These guys were a ton of fun to paint - and I'm glad they were seeing as I need at least 10 more in the army. Before I tackle a second unit of Arkanauts, I'm going to treat myself to some of the ballon guys first.

Cheers!


Sunday, November 19, 2017

Noxious Blightbringer and Step-by-Step

I've been chugging along with hobby projects this week - I finished my first Plague Marine character, assembled a third Contemptor dreadnought and have been chipping away at some more Sector Mechanicus scenery. More on the last two another time, for now here's my Noxious Blightbringer.

For Whom the Bell Tolls! This guy is worth it just for all
the bell puns my opponents will have to endure during a game!
Back detail. This cat is crawling with detail. Its nuts to compare
him to plastic kits from years ago.
I decided on doing my nurglings in a brighter color so that they
contrast well with the otherwise drab colors of the Death Guard.

I managed to take some step-by-step photos of this guy while sharing progress over on Twitter. Here they are with some notes of how I got to the final stages.

Step 1. Spray with a Black primer. Over this, I sprayed
the entire model with Krylon Camp Green.
Step 2. I painted the smock in Vallejo Beastly Brown and washed it with Army
Painter Strong Tone ink. Once dry, I added highlights by progressively
mixing GW Ushabti Bone with the Beastly Brown.
The god was painted with GW Retributor Armor washed with GW
Reikland Flesh Shade and highlighted with GW Shining Gold and final
snaps with GW Runefang Steel.
Step 3. I added more gold trim and base coated the plasma pistol's
and the censor's vents with Vallejo Jade Green. The fleshy parts were base
coated withVallejo Squid Pink then washed with GW Reikland Flesh Shade.
Final highlights on the flesh were done with fine lines of Vallejo Dwarf
Flesh. I also stippled some blood onto the smock with a mix
made of 50/50 Vallejo Red and Black.
The horns were base coated GW Administratum Grey and then
washed with Army Painter Strong Tone ink. This was done in two
coats. After the last coat dried, I did a third coat with Army Painter
Dark Tone ink just towards the tips. Final highlights were
picked out with thinned GW Ushabti Bone.
The Green of the armor was washed with GW Reikland Flesh Shade and
then highlighted with Vallejo Heavy Grey. Final snaps were added
with a mix of Heavy Grey and Ushabti Bone.
Step 4. Silver metals were base coated in GW Leadbelcher and then
washed with Army Painter Strong Tone ink. Once dry, highlights were added
with GW Runefang Steel.
The Nurgling was base coated inVallejo Jade green and washed
with Druchii Violet.
Step 5. The plasma vents were highlighted with Vallejo Jade Green
progressively mixed with Vallejo Skeleton White. The Nurgling was
highlighted by mixing in more and more GW Ushabti Bone with
Vallejo Jade Green. Sores were coated with a thinned down layer
of GW Lothern Blue to give a bruised look. 

Then it was just a matter of popping him off the painting stand and attaching him to a base I'd built. He was a lot of fun and I'm looking forward to working on more of these dudes.

Cheers!


Saturday, May 13, 2017

More Shootaz! And a Paintin' Tutorial

I have added 10 more Shoota Boyz to my existing mob this week, bringing the whole lot to 20 some odd models. Or, a proper-sized mob as you might call it. I had planned on doing this during 7th edition 40k as shooting was so much bigger a part of the game than assaulting, and I hope its the right decision for 8th edition (which I am eagerly looking forward to).

10 more jerks to join da scrum!
I also painted up another Nob to bring my Nobz mob up to 9 models and a Warboss. I think I'll add one more for an even 10 down the road.

A very slight conversion of making the power claw right
handed and the pistol in the left. Yeah, I still feel dumb
for not puttying that arm seam. Dag.

While sharing this guy on Facebook, I was asked for an Ork tutorial so I guess this guy is as good as any to show it on. Build the model and add sand to the base first. I always prime Orks black and then attach the assembled model with a touch of superglue onto a little painting post so I can hold that and not touch the model as I work.

Step 1: Basecoating
Skin - Vallejo Heavy Grey (sort of an Olive drab)
Pants - P3 Coal Black
Boots/Straps/Cloth - Vallejo Charred Brown
White Areas - paint GW Ushabti Bone over the Brown
Metals - GW Leadbelcher for silver and Vallejo Bright Bronze for gold
Step 2: Shading
Give the entire model a coat of
Army Painter Strong Tone Ink.
This step is really best done before you go to bed for the night, or
go out shopping, or play Diablo for hours, or whatever it is you do
where you aren't staring at a model and waiting for ink to dry.
It takes a good hour or two for this stuff to dry.
Step 3: Bringing the Color back up
Drybrush silver metals with GW Runefang Steel.
Give the lower areas of gold a thinned down wash of P3 Brown Ink.
Leather areas are highlighted with Vallejo Dark Flesh.
White areas are painted with a coat of GW Ushabti Bone.
Skin is given a coat of Vallejo Heavy Grey, leaving some recessed
areas in shadow.
Step 4: Highlighting
Drybrush the gold areas with a little GW Auric Armor Gold.
Mix 50/50 Vallejo Skeleton White with GW Ushabti Bone and highlight
the edges of white areas.
Mix 50/50 Vallejo Heavy Grey with GW Ushabti Bone and highlight
the musculature of the skin.
Step 5: Details
Add checker board pattern with P3 Coal Black.
Dot laser eye and tubes on Power Klaw with Vallejo Red.
Add some final skin Highlights on the lips and jaw with
25/75 Vallejo Heavy Grey and GW Ushabti Bone mix.
Step 6: Almost there!
Wash very thinned down Vallejo Red over the lips and mouth.
Drybrush the base with P3 Greatcoat Grey.
When dry, randomly drybrush some areas on the base with
GW Trollslayer Orange. 
Step 7: Tidying Up
Paint fangs and nails with GW Zamesi Desert.
Add red stripes with Vallejo Red.
Add a dot of GW Trollslayer Orange into robit eye.
Drybrush bash with GW Adminustratum Grey
Step Done: Being Done
Add a highlight of GW Ushabti Bone to fangs and claws.
Trim the base with Vallejo Black.
Add a tuft of grass using Gamergrass tuft and a dot of superglue.
Then go crush in the name of Gork. Or Mork. Or both.
I don't tell you how to live your life.


Yep. And dat's it. All dun. Its a quick way to get a nicely painted model on the board. Its not going to win any Golden Demons, but it will look better than 90% of the stuff out there.

Cheers!