"In a hole in the ground there lived a hobbit. Not a nasty, dirty, wet hole, filled with the ends of worms and an oozy smell, nor yet a dry, bare, sandy hole with nothing in it to sit down on or to eat: it was a hobbit-hole, and that means comfort."
With the addition of some more models to my Halfling army, I realized that I'd need some bespoke terrain for them - to act as scenario objectives and/or add character to battlefields that the little legion would play on. I wanted to create some cheap and fast Hobbit Holes for my army to live in. I saw that Games Workshop was putting out some nice resin facades to build off of eventually, but I just didn't want to wait or spend the money. I looked for a good tutorial online for building what I was looking for, but I just didn't find one. So I guess I had to do one myself.
The material list isn't too long and mostly consists of stuff I had lying around. You'll need:
- Some 2" thick insulation foam. - A plastic drinking straw.
- A blank CD to act as the base. - Some scrap cardstock/cereal box cardboard.
- Some balsa wood strips. - A push pin.
- Various flock/plastic flowers/tufts. - Xacto knife and a box cutter with an extendable blade.
- Hot Glue gun. - Wall joint compound
- Wood Glue or Elmer's Glue
 |
Step 1: Cut a slab of foam about 1/4" deep, 5" long and 2" high.
Using a ballpoint pen, I drew out the windows, door and stonework for the
front of the house. |
 |
Step 2: Using a sharp Xacto blade, cut out the windows and door.
I also removed some of the non-stone area to recess that a bit and bring
the stone forward. |
 |
Step 3: Glue some scrap card onto the back of the front piece.
It'll give you something to glue the door and window bits to. |
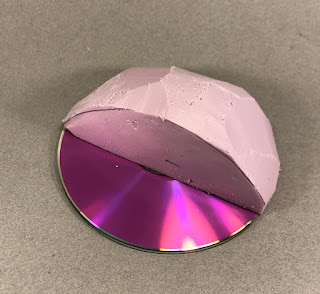 |
Step 4: Using a hot glue gun, I attached the 2" foam to the CD as a
base. I then used a box cutter with an extendable blade to shape the hill
until it matched the approximate curve and height of the front piece. |
 |
Step 5: I then attached the front piece using hot glue. Any gaps or joins were
hidden with some wall joint compound. I then glued a bit of drinking straw to the hill to
form a chimney. A few thin cuts of foam were added to make a walk. |
 |
Step 6: I added a door and cross beams using balsa wood. A dress maker's
pin was used to make the door hand. I also soaked a piece of balsa wood in
water until I could bend it into a curve along the top edge and then affixed it
with hot glue. A small cap was added to the chimney with some cardstock.
Finally, sand was glued down to the front porch area. |
 |
Step 7: I primed the whole shebang with a bit of flat latex black house paint.
Then I painted the whole thing up in a pretty standard way. |
 |
Step 8: I then flocked the hill to match my game boards and added some
tufts, clump foliage and flowers to really make the hole feel homey. |
And that's it. Each Hobbit Hole took about an hour to make and cost me pretty much nothing as I had all the materials to build them laying about already. They aren't the most amazing pieces of scenery ever made, but they will really add something to the games I end up playing with my Halfling army. Hope this inspires!
Cheers!
 |
| A few nights work and I have my own little Shire to defend! |


